
How I Built My First Vibe-Coded App with Figma Make—A Beginner’s Step-by-Step Guide
A beginner-friendly walkthrough of vibe-coding an app using Figma Make, packed with practical tips and clear steps.

I created my first vibe-coded product!
Actually, that’s not true. I had tried out v0 and Replit early and mid this year, but I never finished what I was building.
This week, though, I finally started something in Figma Make and completed it for the Figma Make-a-thon.

While I was building this, I realised why it had taken me so long to vibe-code and ship a product. I’d been overwhelmed by the possibility of complexities, not sure if that word even fits. But yeah, I didn’t want to go down a rabbit hole and get stuck. Although vibe-coding and its amazingness are preached daily, designers and non-technical founders still tread around it with caution, scared to start or worried it’ll be too technical or complex.
Here’s me saying your worries are needless for real. Figma Make is a great place to start your vibe-coding journey. You don’t have to already have an idea or some cool concept. I didn’t either. But believe me, once you start, you’ll feel like you’ve broken a hedge.
To help others like me begin their vibe-coding journey, I’m documenting my process.
Why I built Better Days (my product of choice)
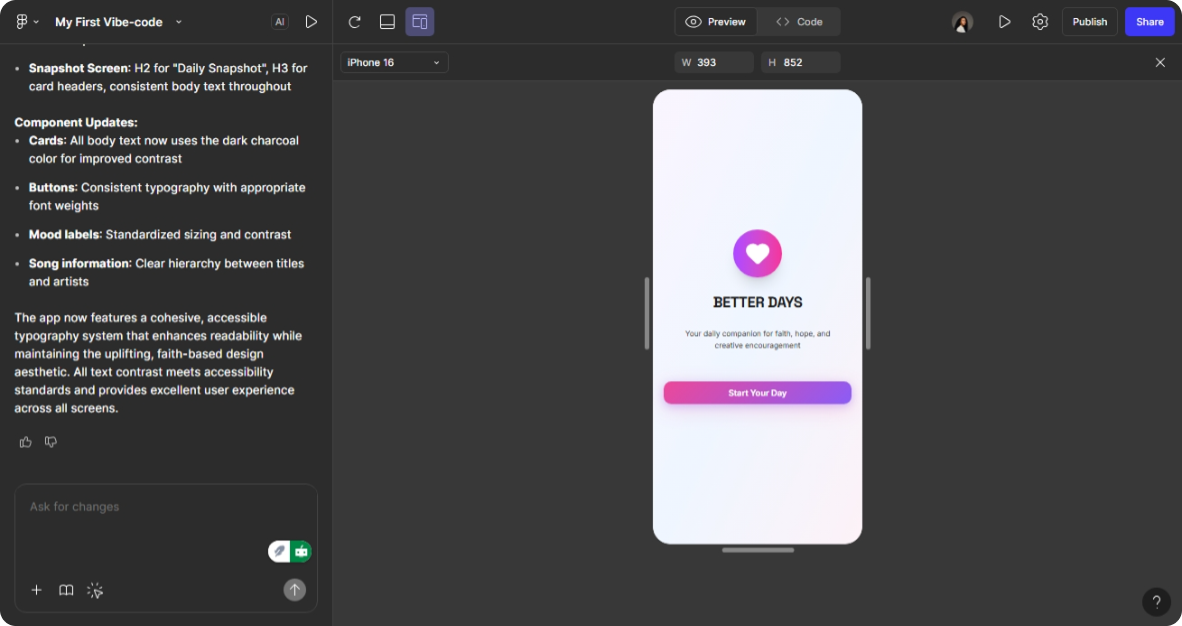
I love music. I’m a fan of great music, especially great gospel music. Gospel music has changed my life for real, and I feel it’s very underrated. There are almost every genre of gospel music featuring so many talented artists, and I wish more people were uplifted every day like me. So I built Better Days, a light, soul app that blends faith, music, and healing to encourage others like me. It is specifically for job seekers, people with lots of responsibility, and anyone overwhelmed with just getting into tech who loves good music.
I had no idea what to build at first and dove straight in. To avoid rabbit holes, I decided to structure my process, go step-by-step, and think two steps ahead (just like chess). For this project I used only ChatGPT and Figma Make. I believe if you follow my process, you’ll have a smooth ride vibe-coding your first app.
The Phases
I break my process into two phases:
The prep phase: Everything before I got into Figma. I did these steps inside ChatGPT, which prevented lots of mistakes, especially since I was building side-by-side with ChatGPT and didn’t want it hallucinating on me.
The build phase: I shuttled between Figma Make and ChatGPT for the initial build and later refinements.
The Prep Phase
Step 1: Laying the groundwork
I use a free ChatGPT plan, and the first thing I did was what I call a groundbreaking prompt. This prompt gave ChatGPT context on what I was building, the circumstances around my attempt, and what I wanted, then asked it to help me brainstorm ideas. Here’s the prompt I used:
“I'm partaking in the Figma 2025 Make-a-thon. I have no idea what to build. This will be my first time vibe-coding or using Figma to make a vibe code. I want to build something that is relevant to me and also unique. I need you to help me find out what is relevant to me, which I will enjoy building too. Ask me questions that will help me and also suggest possible ideas. Remember that this is my first attempt at vibe-coding.”
ChatGPT asked questions that helped me pinpoint something deeply relevant, simple enough to execute, and unique.

While I answered the questions, an idea began to form. I fell back on my love for gospel music and knew I wanted something not too serious, almost whimsical, but useful to myself and others and quite easy to make. Something interactive.
One thing I love is how helpful it is to act ignorant with LLMs. Believe me, I learn a lot by pretending to be ignorant and asking weird questions. I just asked ChatGPT about this, and it seems to think otherwise, though. Lol.

Step 2: Refining the idea
I fed my idea to ChatGPT and asked it to ask clarifying questions. Doing this is very important. The questions ChatGPT asked greatly helped refine the concept.

Step 3: Crafting the flow
Once you answer the questions ChatGPT asks, it will most likely start helping you draft a flow for your product. For me, the flow was pretty simple, with no complicated sign-ins or saving of user data. I just wanted something light and helpful.
Welcome → Mood Selection → Encouragement → Song Recommendation → Journal Log → Welcome
Step 4: Designing the Structure
After deciding the flow, I mapped out the visual and interaction style and the components I’d need. It felt like creating a verbal or written design system. Doing this up front is important and saved me lots of time during the post-initial build. I defined the design style (with ChatGPT’s help), the colours representing each mood, the fonts, the tone of voice for the encouragement copy, and the simple interactions. I also listed the components I’d need and their appearances. (If you’re just starting out in design, I’ve linked a component checklist at the bottom of this article.)
All this happened in text: me feeding ChatGPT and getting structured outputs in return. Defining these details was like sorting Lego bricks; it helped ChatGPT give me the right initial build prompt, complete with everything I needed.

One note: while I was building this app, my version of ChatGPT wasn’t knowledgeable about Figma Make. In your case, ChatGPT might prompt you to create a prompt for the build, so you want to ignore that until you’ve got everything else set up.
Step 5: Crafting the prompt
Nothing fancy or poetic since ChatGPT and I had already laid everything out. I simply told ChatGPT to give me a prompt. I had to remind it what Figma Make was because it never prompted me to create a prompt, so I figured it wasn’t in the know yet. I just wanted to be safe. Lol. Glad I did.

The prompt I received was really comprehensive: font pairings, the design system, a list of components and screens, content samples, a prototype flow, and additional instructions. It was long, so I can’t include a screenshot here, but I’ve linked the Figma Make file at the end of this article so you can view the prompts and remix the project if you choose.

The Build Phase
Step 6: Initial Build
I pasted the prompt into Figma Make and didn’t see anything to remove or tweak, thanks to the prepping. I thought the prompt was perfect. Here’s the initial result.

Step 7: Making Iterations
From that initial output I noticed issues with accessibility, typography, and aesthetics. Not as bad as I’d imagined, but still there. I noted these issues and prompted ChatGPT for fixes. I didn’t try to fix everything at once; I broke the issues down and tackled them one at a time. I asked for prompts addressing three specific issues and used them to refine the build until I ran out of credits for the day on Figma Make.

I was only able to prompt Figma Make four times before I ran out of credits. Credits reset daily, so I continued the following day.
I kept iterating step-by-step until I was satisfied with the result.

If you enjoyed this article, I hope you’re ready to start your vibe-coding journey (if you haven’t already tried Figma Make). Personally, I think Figma Make is very design-friendly, which makes it great for non-technical people. You can use it to test ideas, and following my process should help you avoid many pitfalls.
As promised, here are links to my Figma Make file and the Components Checklist.
https://www.figma.com/community/file/1546858227958280276/daily-companion-app
https://www.figma.com/community/file/1546873624173160653
I’m Evergreen Odeh, a senior product designer, business strategist, and mentor. With 4+ years of experience across e-commerce, gaming, AI, edtech, and more, I bring deep product thinking and emotional nuance to every product I design. If you’re building something AI-powered, let’s talk.
This article is an edition of The Designers Edge. If you’re not yet a subscriber, join here.
I’m building this into a thoughtful space for designers and founders who want to create with confidence, clarity, and purpose. I’d love to have you on the journey.
You might also like:
